This section is devoted to the instructions on analysis of various equipment: different mechanisms of automobiles, home appliances and mobile devices.
Articles presented here will help you in the repair of the technician, or just to satisfy the curiosity of the form "What's inside with the laptop hard drive?"
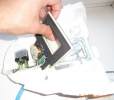
This copy was purchased in a normal car shop. The main purpose-comfortable, quick and easy to help run the car with the dead battery, by connecting existing "crocodiles" to terminals regular battery.
A small survey before parsing
Look after review of a similar, but slightly more powerful: Chinese JX-R02 30000 mAh!
Characteristics, according to the label:
Capacity: 12000 mAh.
Starting current: 200 A.
The maximum current is 400 A.
Manufacturer's... read more
In detail about podobdnom device, read the previous article about Intego AS-0211.
A small overview
Characteristics, according to the label:
Capacity: 30000 mAh.
Starting current: 300 A.
The maximum current: 600 A.
This went in the box. A classic in the box for such devices cover a number of different nozzles inside.
"Crocodiles":
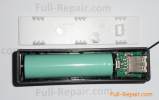
Seen in the photo above unit in the chain of positive lead? This one:
Open and see what's... read more
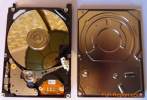
Let us examine the hard drive SATA 2.5 "from the laptop.
So it looks like:
View from below:
Turn off the controller (it is held by three screws kind of "star") and remove it.
The controller is a separate screen:
Unscrew the screws, "star" of the top cover and remove it (one was under the label).
Turn off the mount disks and remove them and not only.
This CD was junk. But if you understand working in a... read more

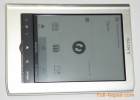
Let us examine the Chinese 7-inch Tablet PC Colorfly G708.
So it looks like the front:
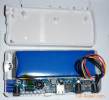
Back view:
Remove the rear upper end cap. She podkovyrivaetsya and removed. Under it we see a connector for MicroSIM-card, as well as a card MicroSD.
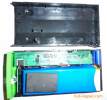
Just below this cap, we see three screw that hold the rear main cap. Unscrew them and the same podkovyrivaniem will remove the entire back cover.
Under the hood we will see a lot of different viscera... read more
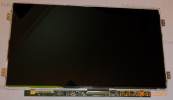
After replacement laptop matrix Acer Aspire One was left broken and we will see what it is made-analyze the matrix completely.
Come off while retaining the foil around the edges.
Pull out the very matrix of the LCD from the case.
The remaining case:
In the lower part of the housing is a series of LEDs.
For a uniform dispersion of light from the bottom of a multi-layer diffuser... read more
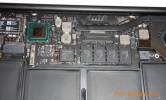
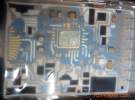
To remove the back cover you will need a special screwdriver to form a five-pointed star. Such a great deal on Aliexpress.
Unscrew the small screws and the cover is easily removed, can see inside.
Of the "computer" inside is not so much a large portion of six energoyacheek. That is why he is able to work relatively long time (hours 2-4).
Some photos a little more close-up:
Solid State Drive (SSD) is pulled out basic-need to... read more
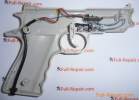
Accidentally I saw in toys gun from the game console Dendy. It is always interesting was what was inside, now I know, and I share with readers.
It rests on the four screws. Unscrew and open the housing.
Behind the lens is a photodiode in the usual case (a very popular housing for the five millimeter LEDs).
Then there is a small circuit. "Trigger" includes it. If the photodiode "see" white box (label) on the screen, and the amplifier will "see" it means the game hit... read more
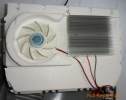
It looks like a small portable Peltier cooler.
It is powered by 12 volts and has a connector for connection to the vehicle's cigarette lighter. Power Consumption: 48 Watts. At home, you can connect from your computer. For example, in the case of domestic refrigerator defrost.
The fun is in the top cover, but only one.
Cover, top view.
Cap bottom view.
Remove the two screws that hold the radiator and remove it.
Here aluminum... read more
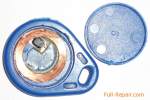
How work wireless keys?
Inside the coil, closed on a chip. When you hit the key in the electromagnetic field of the reader coil current begins to flow, which is powered chip. At power up the chip starts to give out to the winding sequence of pulses-sewn in the key code.
We analyze key wireless doorphone
Broke down the contactless key doorphone. Just stopped working.
Before you throw decided to take it apart and examine the inside.
He understands... read more
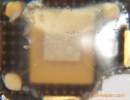
Let's start with picture from Wikipedia:
A crystal-this is the basis of SIM-card in it and the memory and the processor and everything else needed for the job.
Let's move on to the practice-to the analysis of SIM-card. Wanted without advertising, but hidden advertising is still there for those who know the operator.
Crystal and saw provodnichki connecting metal contacts with the crystal. And inside the crystal is nothing but brilliant... read more
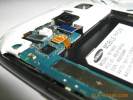
Look of the phone:
Remove the back cover.
Unscrew the screws and disassemble continue.
Take off the rest of the back part of the case.
Let's start off connectors on the motherboard
Unscrew the screws securing the motherboard and get her out.
They pulled the motherboard:
'll Take some more stuff:
Now you can unstick a piece of glass. It is... read more
So it looks like the top panel:
The compressor is located behind the way it is installed capacity of the condensate dripping from the evaporator (this is a big black plastic piece that the compressor).
If we remove all the shelves in the lower chamber (cold), and a lower dome light bulb, you will see the following picture:
To the fridge was brighter than it is installed energy-saving lamp power of 11 watts. The bulb more... read more
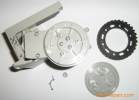
In wheels with time stuffed dust and hair, which causes difficulty of rotation, in which case they must be cleaned. Consider the example of a relatively new wheels. To start the wheel must be removed from the robot vacuum cleaner about it here: screen replacement robot cleaner.
Remove the three plastic caps that conceal the screws securing the wheel.
Unscrew the screws and remove the top part of the wheel.
Now untwist the wheel itself and... read more
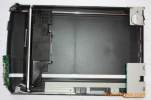
Will dismantle the old scanner Epson.
Remove the cover.
Her white part removed, underneath the device radiographic slides.
It consists of a fluorescent lamp in the power supply unit and diffuser.
The scanner itself.
Remove the top part of the case.
Here, the main board and the board with buttons, motor with gear and a mobile scanning element.
Motor unit.
Scanning... read more
'll Disassemble the air flow sensor (English Mass Air Flow Sensor), also known as flow of air from the diesel engine CRDI D3EA 1.5. Part: 28164-27500, an analogue of Bosch: 0281002528. You can order, for example, here.
So it looks like:
Otkovyryali top cover, it sits on the sealant.
Inside we see the processing scheme, potted himself MEMS sensor placed in the channel for air (MEMS-microelectromechanical systems it).
More close-up, click... read more
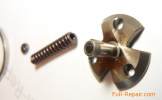
Code nozzles from Nissan: 16600-AW40A.
Code injectors on catalogs of manufacturers (Denso): 095000-5130.
Externally, apart from having two calibration contacts, nozzle looks just like Denso injector from Mitsubishi.
In the photos below you can see that these two gauge pins are connected with a certain device inside that tells the engine calibration information. Further personal guess the author of these lines on the basis of information from the global network on this... read more

It looked like a block initially, after loosening the mounting screws:
Next look at this same block that has already been dismantled. Let us examine it again.
The block together with the fastener.
Unplug the connector from the block.
Remove the mounting bracket.
Open the back cover.
Motor cover held by two screws, and sealant. Otkovyrivaem unscrew the screws and cover.
Here it is-the... read more
 Full-Repair.com